前言
在使用App过程中,经常会有使用到联系人或城市列表的场景,其实这两种效果是一样的,都是右边有个索引列表,点击索引列表可跳转到指定字母开头的联系人或城市上去,同时向上滑动过程中头部会有个显示当前联系人首字母的界面固定不动。下面我以微信通讯录的效果作为例子,介绍我是如何实现一个这样效果自定义View的思路和过程。
实现效果
下面是我实现的最终效果图(GIF录制的不太好),想看源代码的同学戳这里https://github.com/huyongli/IndexStickyView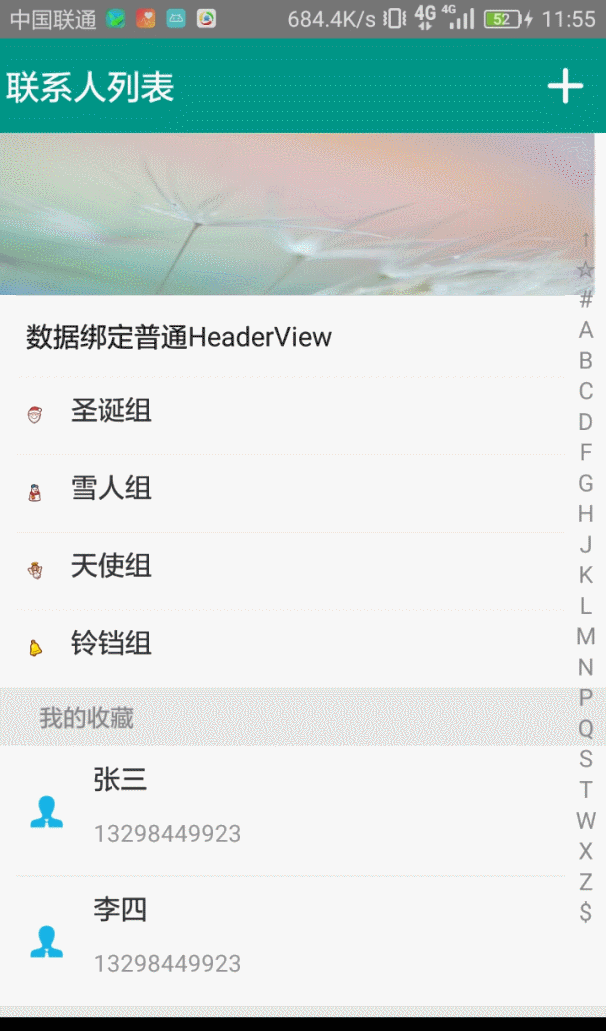
思路分析
既然要高仿实现微信通讯录的效果,那我们来先看看微信通讯录的效果
微信通讯录效果分析
通过对微信通讯的效果进行分析之后,得出如下几点:
- 通讯录展示分为两部分:
- 主体:联系人列表
- 索引条:右边字母索引条
- 主体联系人列表又分为三部分:
- 联系人姓名和头像展示
- 根据联系人姓名的首字母进行分组,每组开头都会显示组名称(首字母),并按字母顺序排序
- 列表开头的四个菜单,可以看成是一个特殊组数据,但是无组名称展示
- 索引条中的内容与联系人列表中的所有组字母一样,同时点击索引条中的字母会将列表定位到当前字母所代表的联系人组,因此索引条的每个字母会与该字母所代表联系人组的位置有个一一对应关系
- 点击索引条中的
↑会定位到列表头部的四个菜单上,因此可以将↑与四个菜单作为一组对应关系,只是该菜单组无组名称 - 点击索引条的某个字母时,列表中间会有该字母的提示显示
- 列表向上滑动时当前组的组名称固定在列表头部显示不动,直到下一组组名称滑动到顶部时,原来固定不动的组名称视图开始往上滑出,下一组组名称顶替上去
实现思路分析
- 既然要展示联系人列表,所以我采用
RecyclerView - 滑动过程中顶部会有个视图固定不动,而
RecyclerView滑动时不可能有子视图固定不动,因此我采用一个独立的视图View来作为这个固定不动的顶部视图显示组名称,在滑动过程中控制该View的显示和隐藏及其内容的变化,显然这个时候就需要父视图将RecyclerView和这个头部视图View包装起来 - 索引条因为是一个字母索引列表,因此我采用自定义
View来绘制这些字母,在绘制过程中每个字母在索引条中要水平居中,而当列表头部有固定显示某个组名称(字母)时,索引条中对应的字母会有一个红色的圆作为该字母的背景,同时字母在圆中居中显示 - 点击索引条的字母时,列表中间出现的字母提示也采用一个独立的
View显示,并将该View放到与RecyclerView所处的同一父视图。 - 索引条中的每个字母都需要与列表中对应组所在的位置索引有个一一对应的关系
- 因为微信通讯录中顶部的四个菜单与其他联系人具有不同的行为和展示方式,因此最终实现的
View需要支持自定义显示不同的头部视图及对应的索引字母
实现细节
下面我介绍下我在实现过程中的一些要点
数据处理
用户数据
一般应用在实现过程中,拿到的只有具体的联系人数据,而没有联系人对应的首字母,如果说我们自定义的View需要开发者将联系人对应的首字母也传进来,那这个自定义View写的也太lower了,对开发者太不友好了。因此我们最终实现的View所需要的数据就是开发者能拿到的联系人数据即可,这样的话就需要我们在实现View的过程中将开发者传递过来的联系人数据进行处理,然后得到我们在RecyclerView中展示的实际数据(联系人+字母索引)。
既然要对联系人数据进行处理得到该联系人的首字母,所以我定义了一个实体接口,所有的联系人数据实体必须实现这个接口以便告知我们需要对那个数据字段进行处理得到其索引首字母,具体接口如下:1
2
3
4
5
6
7public interface BaseEntity {
/**
* 要索引的字段数据信息,例如联系人中对姓名进行索引,则此处返回姓名字段值
* @return
*/
String getIndexField();
}
展示数据
列表在展示过程中有两种类型数据,一种是联系人数据,一种是联系人所在组的组名称(索引值),所以最终在RecyclerView中进行展示时使用用户数据实体BaseEntity是无法达到这种展示效果的,因此我定义了一个RecyclerView实际展示数据的实体类,如下:1
2
3
4
5
6
7
8
9
10
11
12
13
14
15
16
17
18
19
20
21
22
23
24
25
26
27
28
29
30
31
32
33
34
35
36
37
38
39
40
41
42
43
44
45
46public class IndexStickyEntity<T> {
/**
* 当前数据项的类型,自动转换赋值
*/
private int mItemType = ItemType.ITEM_TYPE_CONTENT;
/**
* 当前数据的索引值,自动转换赋值(索引条中显示的文字)
*/
private String mIndexValue;
/**
* 索引视图显示的索引名称(组名称)
*/
private String mIndexName;
/**
* 原始数据,用户实际展示的数据,用于视图的绑定
* 当次值为null时,则表示此实体代表一个Index数据
* T extends BaseEntity
*/
private T mOriginalData;
/**
* 当前数据项的拼音
*/
private String mPinYin;
... setter & getter
}
public class ItemType {
/**
* 列表中普通数据项类型,例如联系人列表中的:联系人信息项
*/
public static final int ITEM_TYPE_CONTENT = 1000000;
/**
* 列表中索引项类型,例如联系人列表中的:A,B,C...等索引数据
*/
public static final int ITEM_TYPE_INDEX = 2000000;
/**
* 列表中增加头部索引数据(如自定义的常用联系人)
*/
public static final int ITEM_TYPE_INDEX_HEADER = 3000000;
/**
* 列表中增加底部索引数据
*/
public static final int ITEM_TYPE_INDEX_FOOTER = 4000000;
}
用户数据 –>展示数据
在拿到用户的联系人数据后,进行转换处理得到真实展示数据,实现如下,代码中注释比较清晰,就不一一解释其实现逻辑了:1
2
3
4
5
6
7
8
9
10
11
12
13
14
15
16
17
18
19
20
21
22
23
24
25
26
27
28
29
30
31
32
33
34
35
36
37
38
39
40
41
42
43
44
45
46
47
48
49
50
51
52
53
54
55
56
57
58
59
60
61
62
63
64
65
66
67
68
69
70
71
72
73
74
75
76
77
78
79
80
81
82
83
84
85
86
87
88
89
90
91
92
93
94
95
96
97
98
99
100
101
102
103
104
105
106
107
108
109
110
111public class ConvertHelper {
/**
* 转换过程中,如果待索引字段信息为非字母串,则将其索引值设为:#
*/
public static final String INDEX_SPECIAL = "#";
public static class ConvertResult<T> {
//转换后得到的实际展示数据列表,包括联系人数据+组名称数据(索引名称)
private List<IndexStickyEntity<T>> mIndexStickyEntities = new ArrayList<>();
//索引条中展示的数据列表
private List<String> mIndexValueList = new ArrayList<>();
//索引条中展示数据与对应组在列表中位置索引的一一映射
private Map<String, Integer> mIndexValuePositionMap = new HashMap<>();
public List<IndexStickyEntity<T>> getIndexStickyEntities() {
return mIndexStickyEntities;
}
public List<String> getIndexValueList() {
return mIndexValueList;
}
public Map<String, Integer> getIndexValuePositionMap() {
return mIndexValuePositionMap;
}
}
//拿到数据后调用此方法进行数据转换处理
public static <T extends BaseEntity> ConvertResult<T> transfer(List<T> list) {
ConvertResult<T> convertResult = new ConvertResult<T>();
//使用TreeMap自动按照Key(字母索引值)进行排序
TreeMap<String, List<IndexStickyEntity<T>>> treeMap = new TreeMap<>(ComparatorFactory.indexValueComparator());
for(int i = 0; i < list.size(); i++) {
IndexStickyEntity<T> entity = originalEntityToIndexEntity(list.get(i));
if(treeMap.containsKey(entity.getIndexValue())) {//Map中已存在此索引值
treeMap.get(entity.getIndexValue()).add(entity);
} else {
List<IndexStickyEntity<T>> indexStickyEntities = new ArrayList<>();
indexStickyEntities.add(entity);
treeMap.put(entity.getIndexValue(), indexStickyEntities);
}
}
for(String indexValue : treeMap.keySet()) {
//创建组名称展示数据实体
IndexStickyEntity<T> indexValueEntity = createIndexEntity(indexValue, indexValue);
//将索引值添加到索引值列表中
convertResult.getIndexValueList().add(indexValue);
//按顺序将索引实体添加到列表中
convertResult.getIndexStickyEntities().add(indexValueEntity);
//将索引值与索引值在结果列表中的位置进行映射
convertResult.getIndexValuePositionMap().put(indexValue, convertResult.getIndexStickyEntities().size() - 1);
//得到当前索引值下的索引数据实体
List<IndexStickyEntity<T>> indexStickyEntities = treeMap.get(indexValue);
//对数据实体按自然进行排序
Collections.sort(indexStickyEntities, ComparatorFactory.<T>indexEntityComparator());
//将排序后的实体列表按顺序加入到结果列表中
convertResult.getIndexStickyEntities().addAll(indexStickyEntities);
}
return convertResult;
}
/**
* 原始数据转换成展示的索引数据
* @param originalEntity
* @param <T>
* @return
*/
public static <T extends BaseEntity> IndexStickyEntity<T> originalEntityToIndexEntity(T originalEntity) {
IndexStickyEntity<T> entity = new IndexStickyEntity<>();
T item = originalEntity;
String indexFieldName = item.getIndexField();
String pinyin = PinYinHelper.getPingYin(indexFieldName);
String indexValue;
if(PinYinHelper.isLetter(pinyin)) {//首字符是否为字母
indexValue = pinyin.substring(0, 1).toUpperCase();
} else {//非字母以#代替
indexValue = INDEX_SPECIAL;
}
entity.setPinYin(pinyin);
entity.setOriginalData(item);
entity.setIndexValue(indexValue);
entity.setIndexName(indexValue);
return entity;
}
/**
* 根据索引值创建索引实体对象
* @param indexValue
* @param <T>
* @return
*/
public static <T extends BaseEntity> IndexStickyEntity<T> createIndexEntity(String indexValue, String indexName) {
//根据索引值创建索引实体对象
IndexStickyEntity<T> indexValueEntity = new IndexStickyEntity<>();
indexValueEntity.setIndexValue(indexValue);
indexValueEntity.setPinYin(indexValue);
indexValueEntity.setIndexName(indexName);
indexValueEntity.setItemType(ItemType.ITEM_TYPE_INDEX);
return indexValueEntity;
}
}
SideBar实现
SideBar绘制
- 初始化
SideBar相关绘制参数 - 根据索引列表计算
SideBar的实际高度,并得到SideBar的最终高度 - 根据
SideBar高度计算其每项的高度 - 绘制所有的索引值到视图上,并根据选中情况绘制当前选项的圆形背景
关键代码如下:1
2
3
4
5
6
7
8
9
10
11
12
13
14
15
16
17
18
19
20
21
22
23
24
25
26
27
28
29
30
31
32
33
34
35
36
37
38
39@Override
protected void onMeasure(int widthMeasureSpec, int heightMeasureSpec) {
int height = MeasureSpec.getSize(heightMeasureSpec);
if (mValueList.size() > 0) {
//计算SideBar的实际高度
mCalViewHeight = (int) (((mValueList.size() - 1) * mTextPaint.getTextSize() + mFocusTextPaint.getTextSize()) + (mValueList.size() + 1) * mTextSpace);
}
if (mCalViewHeight > height) {//实际高度超过可用高度
mCalViewHeight = height;
}
super.onMeasure(widthMeasureSpec, MeasureSpec.makeMeasureSpec(mCalViewHeight, MeasureSpec.EXACTLY));
}
@Override
protected void onDraw(Canvas canvas) {
super.onDraw(canvas);
if(mValueList.size() == 0) {
return;
}
//计算每项的高度
mItemHeight = ((float) getHeight()) / mValueList.size();
float radius = Math.min(getWidth() / 2, mItemHeight / 2);//选中状态时圆形背景半径
for(int i = 0; i < mValueList.size(); i++) {
if(mSelectPosition == i) {
//计算文本垂直居中的基准线
float baseline = mItemHeight / 2 + (mFocusTextPaint.getFontMetrics().descent - mFocusTextPaint.getFontMetrics().ascent) / 2 - mFocusTextPaint.getFontMetrics().descent;
canvas.drawCircle(getWidth() / 2, mItemHeight / 2 + mItemHeight * i, radius, mFocusTextBgPaint);
canvas.drawText(mValueList.get(i), getWidth() / 2, baseline + mItemHeight * i, mFocusTextPaint);
} else {
float baseline = mItemHeight / 2 + (mTextPaint.getFontMetrics().descent - mTextPaint.getFontMetrics().ascent) / 2 - mTextPaint.getFontMetrics().descent;
canvas.drawText(mValueList.get(i), getWidth() / 2, baseline + mItemHeight * i, mTextPaint);
}
}
}
点击SideBar选中
SideBar绘制成功后,在使用过程中还有一个重要的场景需要实现,那就是我们点击SideBar的时候要知道我们当前点击的是SideBar中的哪个选项,具体实现思路是这样的:根据当前触摸的y坐标(其实是相对于视图坐标系)和每个选项的高度计算当前触摸点在哪个选项内,具体实现代码如下:1
2
3
4
5
6
7
8
9
10
11
12
13
14
15
16
17
18
19
20
21
22
23
24
25
26
27
28
29
30
31
32
33
34
35
36
37
38
39
40
41@Override
public boolean onTouch(View v, MotionEvent event) {
int touchPosition = getPositionForPointY(event.getY());
if(touchPosition < 0 || touchPosition >= mValueList.size()) {
return true;
}
if(mOnSideBarTouchListener != null) {
//此接口监听主要用于列表跳转到对应的组
mOnSideBarTouchListener.onSideBarTouch(v, event, touchPosition);
}
switch (event.getAction()) {
case MotionEvent.ACTION_DOWN:
case MotionEvent.ACTION_MOVE:
if(touchPosition != mSelectPosition) {
setSelectPosition(touchPosition);//设置选中
}
break;
}
return true;
}
/**
* 根据点击的y坐标计算得到当前选中的是哪个选项
* @param pointY
* @return 没选中则返回-1
*/
private int getPositionForPointY(float pointY) {
if(mValueList.size() <= 0) {
return -1;
}
//根据手按下的纵坐标与每个选项的高度计算当前所在项的索引
int position = (int) (pointY / mItemHeight);
if(position < 0) {
position = 0;
} else if(position > mValueList.size() - 1) {
position = mValueList.size() - 1;
}
return position;
}
点击SideBar某项时跳转列表到对应组
1 | @Override |
固定头部视图处理
头部显示逻辑
- 因为固定不动的头部视图(暂且叫做
mStickyHeaderView其视图实现与组名称视图完全一样)是在RecyclerView的上面,所以当其显示时会遮盖掉RecyclerView的第一个可见项。——这个点很重要 - 获取
RecyclerView的第一个可见项的实体数据IndexStickyEntity- 如果当前数据的组名称为空,则不显示头部视图
mStickyHeaderView,要注意的是前面我在转换数据的时候会给所有普通联系人实体对象都会设置组名称(如果存在) - 如果当前数据的组名称不为空,则显示头部视图
mStickyHeaderView并同时更新其显示内容
- 如果当前数据的组名称为空,则不显示头部视图
- 滚动过程中获取
RecyclerView列表中的第二个可见项的实体数据IndexStickyEntity,比如叫做:secondVisibleEntity- 如果
secondVisibleEntity.getItemType() == ItemType.ITEM_TYPE_INDEX,即为组名称视图(索引视图),此时说明第二组数据已经滚动上来了,需要将固定在头部的mStickyHeaderView视图随着滚动操作慢慢的滑出界面变成不可见,同时secondVisibleEntity则会慢慢滚动到mStickyHeaderView原来所在的位置,此时在界面上看着就像是第二组的组名称视图慢慢的替换了固定在顶部的mStickyHeaderView - 如果
secondVisibleEntity.getItemType() != ItemType.ITEM_TYPE_INDEX则需要将mStickyHeaderView恢复到初始位置。因为当secondVisibleEntity滚动到mStickyHeaderView原来所在的位置后,此时第一个可见项变成了secondVisibleEntity,而此时的第二个可见项则变成了普通的联系人视图比如叫mContactView,而此时列表还会继续往上滚动,随着滚动secondVisibleEntity会慢慢的变成不可见,而mStickyHeaderView已经滑出界面不可见了,所以当secondVisibleEntity.getItemType() != ItemType.ITEM_TYPE_INDEX则需要将mStickyHeaderView恢复到初始位置显示新的组名称。
- 如果
- 列表滚动过程中还需要根据第一个可见项的索引值更新索引条
SideBar的选中项
滚动时头部显示逻辑实现
1 | class RecyclerViewScrollListener extends RecyclerView.OnScrollListener { |
以上是我在模仿微信通讯录实现过程中的实现思路和关键点代码,具体实现细节和使用方式请看码:https://github.com/huyongli/IndexStickyView
喜欢的同学欢迎Star和fork
write by laohu
2016年12月30日
原创文章,转载请出处注明。
下面是我的个人公众号,欢迎关注交流